Developing the first plugin
In this guide we will develop a new module for BatMass that will add support for a new file format for detected LC/MS features.
We will need to:
- Create a new NetBeans module
- Create a parser for the file
- Add support for the new file type
- Add support for importing the file into a project
- Add basic support for viewing the data in tabular viewer and overlay of data over Map2D
The prerequisite for this tutorial is that you have the development environment set up. If you don't have that yet, make sure to go through the setting up dev environment tutorial.
This tutorial might be a little too much if you had no exposure to the NetBeans platform development, so I also strongly recommend that you visit the NetBeans platform documentation website and at least walk through NetBeans Platform Quick Start tutorial it provides plus read this document. The documentation website has a lot of tutorials covering many aspects of the platform in great detail.
Also recommended are: NetBeans Platform Runtime Container Tutorial - so you'll know the anatomy of a platform application better and the set of 10 videos links to which can be found here.
Create a new NetBeans module
Open BatMass module suite in NetBeans, expand its node in Project Explorer, right click the Modules node, click Add New. Follow the instructions in the wizard to create a new module. Give it a descriptive, unique name and Code Name Base, the code name base will be used as the base package of all the source files. All BatMass modules use umich.ms.batmass as the base-name and add suffixes for different modules, e.g. umich.ms.batmass.filesupport for the File Support module. This is needed to avoid class-name clashes.
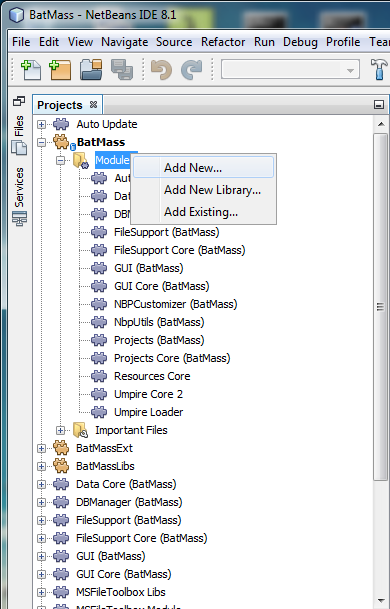
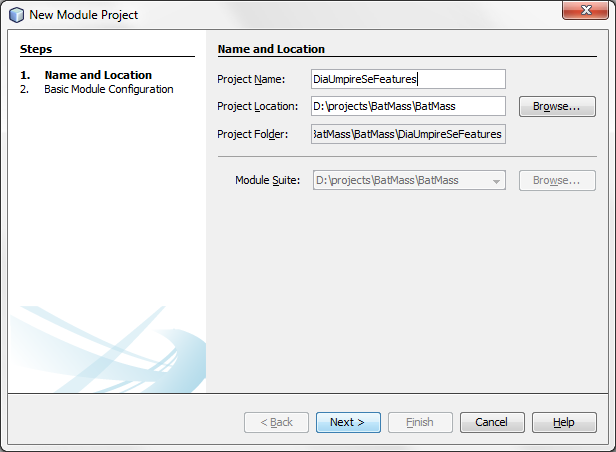
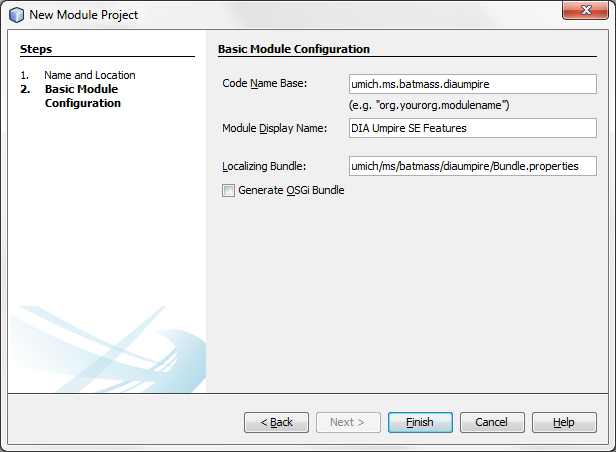
Add 3 packages data, model and providers.
- The
modelpackage will contain our java model for the data in the file. - The
datapackage will contain the wrappers which will adapt the raw data model to the format suitable for viewers. - The
providerspackage will hold the necessary infrastructure to hook into the project system - it will give a way to import existing files into the project, provide an icon for the node, etc.
Create a parser for the file
We will use DIA-Umpire Signal Extraction text output file as an example. It's a simple delimited text format with the first line being column headers, the rest being data stored as text. Even though these are simple text delimited files, we will not be using a library for parsing, instead we'll provide a fast home-grown reader. We'll be using existing helper classes from other BatMass modules for that.
To use functionality provided by some NetBeans module from another module two requirements must be met:
- The module providing the functionality should declare the package it wants to expose to the outside world as public API
- The module that needs to use that functionality must declare a dependency on the providing module. For code completion to work as expected, first compile the provider module.
Providing public API from modules
Expand BatMass -> Modules node in the project explorer, open FileSupport Core (BatMass) module by double clicking on it. In Source Packages node navigate to umich.ms.batmass.filesupport.core.util package. We will be using the DelimitedFiles class. This package is already declared public, but for the learning purposes let's go ahead and check that. Right click FileSupport Core (BatMass) module in the Project Explorer and go to Properties -> API Versioning. You should see that checkboxes of all packages but one are already selected, these packages will be available to other modules if they set dependency on the FileSupport Core (BatMass) module. If you change selection here, recompile the module by right clicking the module node, and running Build (Clean Build is not necessary).
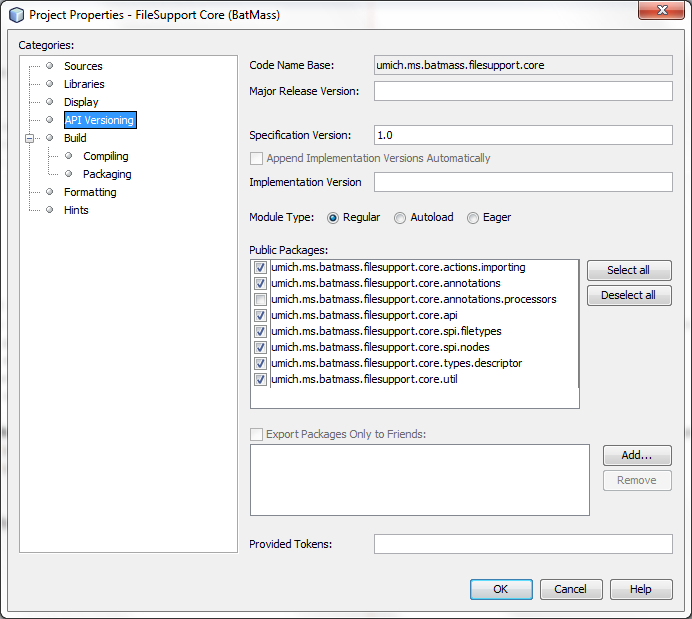
Setting another module as a dependency
Now right click the newly created DIA Umpire SE Features module, go to Properties -> Libraries. In the Module Dependencies tab click Add Dependency. In the search bar at the top start typing “FileSupport”, it should find 2 modules: “FileSupport (BatMass)” and “FileSupport Core (BatMass)". We're interested in the second one, so select it and click OK, you should now see it in the dependencies list.
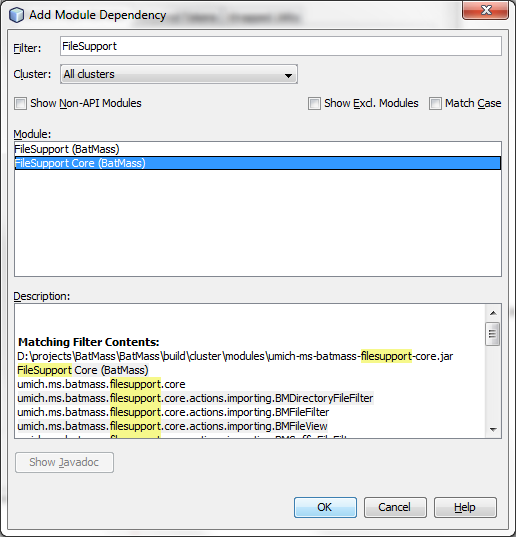
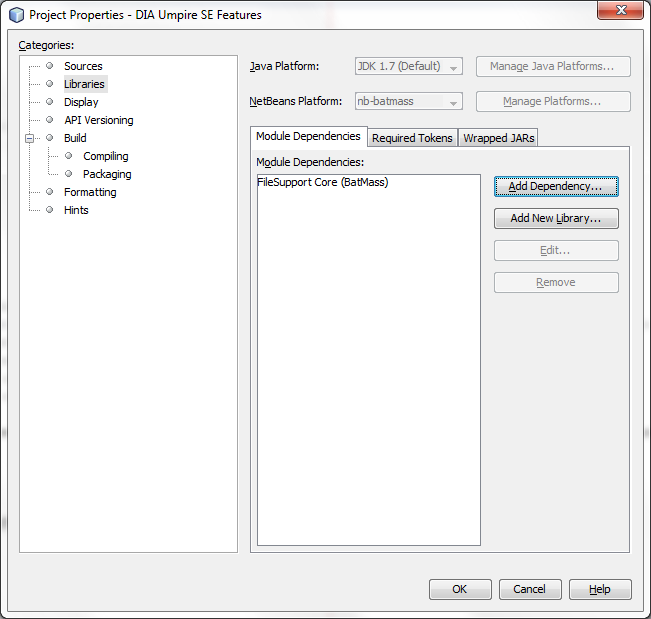
We should now be able to use umich.ms.batmass.filesupport.core.util.DelimitedFiles in our module.
It might seem like a lot of work at first, but as you get used to it, it's not harder than adding dependencies in maven, for example. It is also possible to create maven-based NetBeans modules, but we will not be covering that in this tutorial and this is not used in BatMass.
Model the data
Note
You can skip that part of this section if you like. It just describes the usual Java stuff of reading a file and parsing it into some POJO (Plain Old Java Object). This does not have to be done the way described here.
You can find a sample Umpire Signal Extraction text output file in the folder DiaUmpireSeSeFeatures/resources inside BatMass project. We will not be using all the columns from the file, only a few. Here's our model class:
public class UmpireSeIsoCluster {
    protected double rtLo;
    protected double rtHi;
    protected int scanNumLo;
    protected int scanNumHi;
    protected int charge;
    protected double[] mz = new double[4];
    protected double peakHeight;
    protected double peakArea;

    /**
     * Bare minimum info required to plot something.
     * @param rtLo
     * @param rtHi
     * @param mz
     */
    public UmpireSeIsoCluster(double rtLo, double rtHi, double mz) {
        this.rtLo = rtLo;
        this.rtHi = rtHi;
        this.mz[0] = mz;
    }

    // ... getters and setters
}
We will have a factory class, that knows how to parse the file, I will omit the implementation of create(Path) method.
/**
 * A simple array-list storage for parsed LCMS features from Umpire PeakCluster csv files.
 * @author Dmitry Avtonomov
 */
public class UmpireSeIsoClusters {
    public static String COL_NAME_RT_LO = "StartRT";
    public static String COL_NAME_RT_HI = "EndRT";
    public static String COL_NAME_SCAN_NUM_LO = "StartScan";
    public static String COL_NAME_SCAN_NUM_HI = "EndScan";
    public static String COL_NAME_CHARGE = "Charge";
    public static String COL_NAME_MZ1 = "mz1";
    public static String COL_NAME_MZ2 = "mz2";
    public static String COL_NAME_MZ3 = "mz3";
    public static String COL_NAME_MZ4 = "mz4";
    public static String COL_NAME_PEAK_HEIGHT = "PeakHeight1";
    public static String COL_NAME_PEAK_AREA = "PeakArea1";

    protected List<UmpireSeIsoCluster> clusters;

    public UmpireSeIsoClusters() {
        clusters = new ArrayList<>();
    }

    public List<UmpireSeIsoCluster> getClusters() {
        return clusters;
    }

    /**
     * Factory method to create UmpireSeIsoClusters object from a file.
     * @param path the file to parse data from
     * @return
     */
    public static UmpireSeIsoClusters create(Path path) throws IOException {
        ...
    }
}
Adding support for the new file-type
We'll be working in the providers package.
You can find a working example of what we're about to create in package umich.ms.batmass.filesupport.files.types.agilent.cef.providers of FileSupport (BatMass) module.
The first thing to do is to make the system recognize the new files.
Registering a TypeResolver
To make the system recognize new files we need to register an implementation of umich.ms.batmass.filesupport.core.spi.filetypes.FileTypeResolver interface using @FileTypeResolverRegistration annotation. To simplify things there's an abstract class AbstractFileTypeResolver, so we'll use that.
Create a class UmpireSeTypeResolver extending AbstractFileTypeResolver. Then copy the contents of AgilentCefTypeResolver for simplicity and modify as needed. After copy-pasting you'll notice that some parts are underlined with a red wavy line (specifically @StaticResource, ImageUtilities). Those two come from other NetBeans modules provided by the NetBeans platform, so we'll need to add dependencies. There is a simpler way, rather than going to the Properties of your module. Place the cursor on the line with an error and press Alt+Enter and select Search module dependency for ..., in this case there will be a single search hit for both errors: “Utilities API” and “Common Annotations”.
The @StaticResource annotation is particularly useful - it checks if a static resource can be found at the provided path. If you copy-pasted everything from AgilentCefTypeResolver, then after adding the correct dependency the line
@StaticResource
public static final String ICON_BASE_PATH = "umich/ms/batmass/filesupport/resources/features_16.png";
should still be underlined with the error saying that it “cannot find resource”.
Create a new package resources under umich.ms.batmass.diaumpire and put some 16x16 pixels icon there. You can copy features_16.png from umich.ms.batmass.filesupport.resources (which is in FileSupport (BatMass) module) and change the ICON_BASE_PATH to the correct path to the new icon. Fix other things, like the FileFilter, which will be used in the FileChooser when the user imports the file in.
I ended up with the following class, everything should be clear to you, except maybe BMFileFilter and @FileTypeResolverRegistration. I used FileFilterUtils.suffixFileFilter(EXT, IOCase.INSENSITIVE) instead of an extension filter, because we want to match the files that end in “_PeakCluster.csv”. You'll also need to add a dependencies on “Lib Apache Commons IO” to make this work. We'll get to that @FileTypeResolverRegistration thing right after the code listing:
@FileTypeResolverRegistration(
        fileCategory = UmpireSeTypeResolver.CATEGORY,
        fileType = UmpireSeTypeResolver.TYPE
)
public class UmpireSeTypeResolver extends AbstractFileTypeResolver {
    private static final UmpireSeTypeResolver INSTANCE = new UmpireSeTypeResolver();

    @StaticResource
    public static final String ICON_BASE_PATH = "umich/ms/batmass/diaumpire/resources/features_16.png";
    public static final ImageIcon ICON = ImageUtilities.loadImageIcon(ICON_BASE_PATH, false);

    public static final String CATEGORY = "features";
    public static final String TYPE = "umpire-se";
    protected static final String EXT = "_PeakCluster.csv";
    protected static final BMFileFilter FILE_FILTER = new UmpireSeSeFileFilter();
    protected static final String DESCRIPTION = "DIA-Umpire Signal Extraction peak clusters";

    public static UmpireSeTypeResolver getInstance() {
        return INSTANCE;
    }

    @Override
    public String getCategory() {
        return CATEGORY;
    }

    @Override
    public String getType() {
        return TYPE;
    }

    @Override
    public ImageIcon getIcon() {
        return ICON;
    }

    @Override
    public String getIconPath() {
        return ICON_BASE_PATH;
    }

    @Override
    public boolean isFileOnly() {
        return true;
    }

    @Override
    public BMFileFilter getFileFilter() {
        return FILE_FILTER;
    }

    public static class UmpireSeSeFileFilter extends BMFileFilter {

        public UmpireSeSeFileFilter() {
            super(FileFilterUtils.suffixFileFilter(EXT, IOCase.INSENSITIVE));
        }

        @Override
        public String getShortDescription() {
            return EXT;
        }

        @Override
        public String getDescription() {
            return DESCRIPTION;
        }
    }
}
@FileTypeResolverRegistration
Now as promised we move on to @FileTypeResolverRegistration. This annotation is defined in FileSupport Core (BatMass) module. What it does is it registers an instance of FileTypeResolver in the ‘layer’ file. If you've read/watched basic info about the NetBeans platform linked to in the beginning of this page, you should know that a platform application has a kind of an XML file in it which stores most configuration information. You can edit this file manually, however it is much less error prone to automate the process, and that is done with annotations and annotation processors. After you've annotate a class and try to build the module, the annotation processors are run first - they scan the source code for annotations that they (the processors) support and perform whatever actions are coded in them. With @FileTypeResolverRegistration annotation the FileTypeResolverRegistrationProcessor will read it and automagically create an entry in the ‘layer’. Also, there is not just a single layer file, each module can have its own layer and layers from all the modules comprising an application are merged before application starts.
The good news is that the NetBeans IDE provides a GUI to check the contents of the layer. In the Project Explorer open FileSupport (BatMass) module, and expand the Important Files node in it, you will see the ‘XML Layer’ node in there. If you expand it, there are two entries:
- <this layer> - this one contains the layer entries that this particular module has in its layer file
- <this layer in context> - this one shows the aggregated layer file for the whole application and the modifications/additions by the current module's layer are shown in bold font.
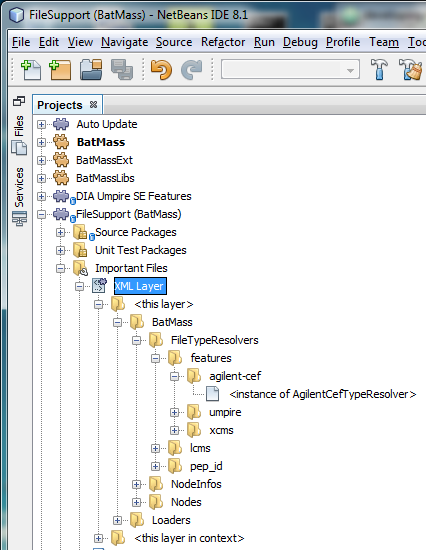
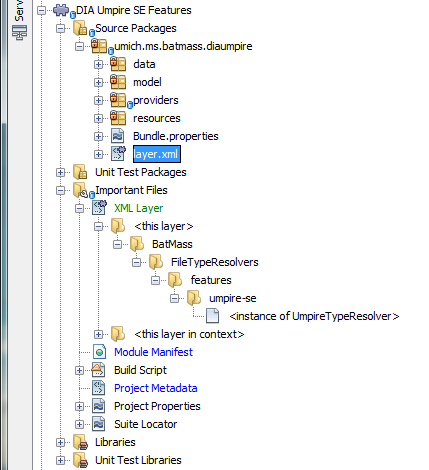
If you now take a look at Important Files for the module we're creating, you won't find the ‘XML Layer’ entry there. Even though the annotation processor did its job, the entry only appears there after you create the “manual” version of the file, thankfully, adding the file is very easy: right click the module node in the Project Explorer, select New -> Other -> Module Development -> XML Layer.
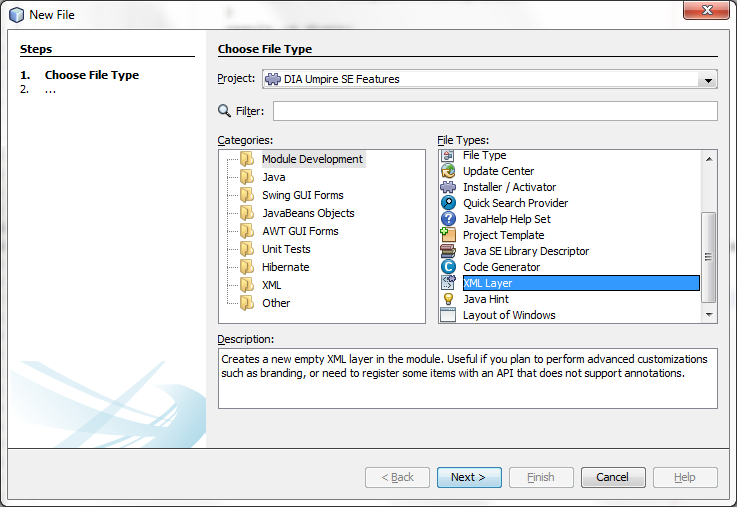
You should now have the layer.xml file in the root of your source packages and also the ‘XML Layer’ node should have appeared under ‘Important Files’. If you've built the module, you'll also see the instance of UmpireSeTypeResolver has been registered under BatMass/FileTypeResolvers/features/umpire-se.
Setting up the Node
We're not done yet, this step only provided enough data to the system to be able to import the file in a project, we'll also need to specify how the file should be rendered in the Project Explorer. For that we need to register an implementation of FileNodeInfo interface in the layer. There's an annotation for that as well, see AgilentCefNodeInfo as an example.
This one is much simpler, I'll just copy-paste everything from the AgilentCefNodeInfo class and change names as appropriate:
@NodeInfoRegistration(
        fileCategory = UmpireSeTypeResolver.CATEGORY,
        fileType = UmpireSeTypeResolver.TYPE
)
public class UmpireSeNodeInfo extends AbstractFileNodeInfo{

    @Override
    public FileTypeResolver getFileTypeResolver() {
        return UmpireSeTypeResolver.getInstance();
    }
}
There's not much going on here, we'll be using the AbstractFileNodeInfo class as base, which only leaves the implementation of getFileTypeResolver() to us. We'll simply return the singleton instance from our newly created type resolver, leaving the rest default.
Running the app for the first time
You can now try running the application! Right click BatMass module suite in the Project Explorer and choose Run. It will build the application first and then run it. If you get tons of errors, you have likely not built the dependent projects. If so, locate the other 3 yellow modules (BatMassExt, BatMassLibs and MSFTBX) in the Project Explorer, right click and Build each of them. When BatMass starts, create a new Proteomics Project, right click LC/MS Features node in it, choose Import LC/MS Features. A file chooser should open and the File Types drop-down menu should contain an entry for the newly created data type.
In this example case I mande a type resolver which recognized the files by their file-name suffix, specifically looking for files which end in “_PeakCluster.csv”. If you create a file with that name anywhere in your filesystem and select it, it should be added as a child of LC/MS Features node now.
Even though the file has been imported into the project, not much can be done with it yet. We have neither exposed any system for parsing the file into meaningful data structures nor declared how the file can be viewed. However, if you right click the imported file, you'll see that the View sub-menu contains two actions: Table and Outline. How did that happen?
Those two entries are Actions and Actions are registered for nodes in the project based on fileCategory and fileType which we used for the type resolver. They are registered using annotations as well. If you go back to UmpireSeTypeResolver you'll see that:
// Here's the registration annotation
@FileTypeResolverRegistration(
        fileCategory = UmpireSeTypeResolver.CATEGORY,
        fileType = UmpireSeTypeResolver.TYPE
)

// And here are the corresponding variables
public static final String CATEGORY = "features";
public static final String TYPE = "umpire-se";
So now you see that we have registered our new file-type under category “features” with type “umpire-se”. It so happens that some other module in BatMass has already registered an two actions for the “features” category, that's why we see those two available. If you read the last sentence carefully, you've probably noticed that I said the actions were registered for the category, however with the type-system in BatMass you can register actions for categories, for concrete file-types or even for categories only for certain types of projects. The targets of action registration only depend on the path in the layer where they're registered.
You'll also notice that the View actions are greyed-out, that's because those actions expect the node to expose some resources, like file-parser or table-model-provider for tabular views. So far our node exposes nothing as we haven't implemented any capabilities.
Adding capabilities to the node
So far our new node is pretty useless. We've seen those 2 actions appear, they are provided by a separate module GUI (BatMass) which contains everything GUI related as its name suggests. Take a look at the umich.ms.batmass.gui.nodes.actions package. Here live the actions that you can invoke from context menus of nodes in the Project Explorer. We're interested in class OpenFeature2DTable from umich.ms.batmass.gui.nodes.actions.features package. It's declared as:
public class OpenFeature2DTable extends AbstractContextAwareAction<FeatureTableModelData> {}
So this is a ContextAwareAction which operates on FeatureTableModelData. That means that it expects to find an instance of FeatureTableModelData in the global Lookup (if you don't know what a lookup is in the context of platform applications, read this). When we select our node for the imported file so far it doesn't expose this particular feature. BatMass defines a single way to add things to a node's lookup - via registering an implementation of CapabilityProvider interface for a node using @NodeCapabilityRegistration annotation. This interface has a single method addCapabilitiesToLookup(InstanceContent, FileDescriptor) - when the method is invoked you are given the InstanceContent that powers this node's lookup (again, if you don't know what I'm talking about, read the link I've suggested above) and a FileDescriptor, which is the BatMass way of representing a link to a file in the filesystem.
You can find an example to copy-paste from in FileSupport (BatMass) module, package umich.ms.batmass.filesupport.files.types.agilent.cef.providers, class AgilentCefDataProvider.
So go ahead, create your own UmpireSeDataProvider extends AbstractCapabilityProvider. AbstractCapabilityProvider simplifies things for you by providing a default implementation of getting the UID. Press Alt+Enter twice on the line declaring the class, the first time you'll import the missing class, the second time you'll choose “Implement all abstract methods”. When the method is created for you, “InstanceContent” will be underlined, that's because it is defined in the Lookup API module, which we did not include as a dependency yet. Go ahead, press Alt+Enter once again and choose “Search module dependency for InstanceContent”.
Add the @NodeCapabilityRegistration annotation to the class, using “fileCategory” and “fileType” from UmpireSeTypeResolver. Code completion works in the annotations as well, so you can type “@NodeCapabilityRegistration()", place the caret between the parentheses and press Ctrl+Space to bring up a list of available properties for the annotation. We'll only use “fileCategory” and “fileType” this time, mine so far looks like this:
@NodeCapabilityRegistration(
        fileCategory = UmpireSeTypeResolver.CATEGORY,
        fileType = UmpireSeTypeResolver.TYPE)
public class UmpireSeDataProvider extends AbstractCapabilityProvider{

    @Override
    public void addCapabilitiesToLookup(InstanceContent ic, FileDescriptor desc) {

    }
}
But we have nothing to add to the lookup yet. Things here get a little hairier because we don't want to parse the file immediately as it has been imported, this should only be done when viewing data is requested and then several views might share the data and then it also needs to be unloaded from the memory when a viewer is closed, etc etc etc.
Making our data recognizable by table and Map2D viewers
The Map2D still won't know how to draw all those features, even though we've created a table model because it won't know which columns are what. So we need another wrapper around UmpireSeIsoCluster class that models just one line from the csv file that we're parsing. It does know how to render instances of ILCMSFeature2D<T> though. There's a helper abstract class AbstractLCMSFeature2D<T extends ILCMSTrace> which is a model of an isotopic cluster. It's a simple container, which holds ILCMSTraces, each trace is just one m/z trace in time. There are no restrictions on implementations, you are free to provide arbitrary paths for traces, however this is a lot of work, so by default AbstractLCMSFeature2D implements all m/z traces as simple bounding boxes (m/z, RT).
Wrapping our model POJOs
So we'll go ahead and create the following wrapper class in umich.ms.batmass.diaumpire.data:
class UmpireSeFeature extends AbstractLCMSFeature2D<AbstractLCMSTrace> {}
As always, just copy-paste the contents from AgilentCefFeature and modify as needed to fix all the errors and changing all instances of AgilentCompound to UmpireSeIsoCluster.
public class UmpireSeFeature extends AbstractLCMSFeature2D<AbstractLCMSTrace>{
    protected UmpireSeIsoCluster cluster;

    public UmpireSeFeature(AbstractLCMSTrace[] traces, int charge) {
        super(traces, charge);
    }

    public UmpireSeFeature(AbstractLCMSTrace[] traces) {
        super(traces);
    }

    public UmpireSeIsoCluster getCompund() {
        return cluster;
    }

    public void setCompund(UmpireSeIsoCluster cluster) {
        this.cluster = cluster;
    }

    public static UmpireSeFeature create(UmpireSeIsoCluster c) {
        int numTraces = c.getNumPeaks();

        AbstractLCMSTrace[] tr = new AbstractLCMSTrace[numTraces];
        for (int i = 0; i < numTraces; i++) {
            tr[i] = new AbstractLCMSTrace(c.getMz()[i], c.getRtLo(), c.getRtHi());
        }

        int z = c.getCharge();

        UmpireSeFeature acf = new UmpireSeFeature(tr, z);
        acf.setCompund(c);
        return acf;
    }

    @Override
    public Color getColor() {
        return cluster.getNumPeaks() > 1 ? Color.MAGENTA : Color.RED;
    }

    /**
     * Overriding this method, because we don't store shapes/bounds for LCMS Traces
     * in Umpire Features.
     * @return
     */
    @Override
    protected Rectangle2D.Double createBoundsFromTraces() {
        int traceNumLo, traceNumHi;
        traceNumLo = 0; // 0-th trace is required to be there
        traceNumHi = traces.length-1;

        double mzLo = traces[traceNumLo].getMz() - traces[traceNumLo].getMzSpread();
        double mzHi = traces[traceNumHi].getMz() + traces[traceNumHi].getMzSpread();
        double rtLo = Double.POSITIVE_INFINITY;
        double rtHi = Double.NEGATIVE_INFINITY;
        for (int i = 0; i < traces.length; i++) {
            AbstractLCMSTrace trace = traces[i];
            if (trace.getRtLo() < rtLo) {
                rtLo = trace.getRtLo();
            }
            if (trace.getRtHi() > rtHi) {
                rtHi = trace.getRtHi();
            }
        }

        return new Rectangle2D.Double(mzLo, rtHi, mzHi - mzLo, rtHi - rtLo);
    }
}
Creating the table model
We will now create the table model, as you would for any JTable. We'll use AbstractFeatureTableModel as the base class, as it provides an implementation of mechanisms for mapping the data from the table to a view on 2D map, however, it all depends on what data your viewer needs to display the data correctly. Add a dependency on GUI Core (BatMass) module, you should be comfortable figuring out the way to do this yourself by now.
public class UmpireSeTableModel extends AbstractFeatureTableModel {
    List<UmpireSeIsoCluster> features;

    protected String[] colNames = {
        /* 0 */ "Mono m/z",
        /* 1 */ "Charge",
        /* 2 */ "RT lo",
        /* 3 */ "RT hi",
        /* 4 */ "Scan lo",
        /* 5 */ "Scan hi",
        /* 6 */ "Total intensity",
        /* 7 */ "Max intensity",
    };
    protected Class[] colTypes = {
        /* 0 */ Double.class,
        /* 1 */ Integer.class,
        /* 2 */ Double.class,
        /* 3 */ Double.class,
        /* 4 */ Integer.class,
        /* 5 */ Integer.class,
        /* 6 */ Double.class,
        /* 7 */ Double.class,
    };

    public UmpireSeTableModel(List<UmpireSeIsoCluster> features) {
        this.features = features;
    }

    @Override
    public String getColumnName(int column) {
        return colNames[column];
    }

    @Override
    public int getRowCount() {
        return features.size();
    }

    @Override
    public int getColumnCount() {
        return colNames.length;
    }

    @Override
    public Object getValueAt(int rowIndex, int columnIndex) {
        UmpireSeFeature f = features.get(rowIndex);
        UmpireSeIsoCluster c = f.getCluster();

        switch (columnIndex) {
            case 0:
                return c.getMz()[0];
            case 1:
                return c.getCharge();
            case 2:
                return c.getRtLo();
            case 3:
                return c.getRtHi();
            case 4:
                return c.getScanNumLo();
            case 5:
                return c.getScanNumHi();
            case 6:
                return c.getPeakArea();
            case 7:
                return c.getPeakHeight();
        }
        return null;
    }
}
If we implement that rowToRegion(int) method, then double-clicking the row will automatically bring us to the region that we calculate in that method in 2D map (if one is linked to the table viewer). Here's a sample implementation:
@Override
public MzRtRegion rowToRegion(int row) {
    if (row < 0 || row >= features.size())
        throw new IllegalStateException(String.format("Conversion from illegal row index was requested, no such row index: [%s]", row));
    UmpireSeFeature f = features.get(row);
    UmpireSeIsoCluster c = f.getCluster();
    if (f == null) {
        throw new IllegalStateException(String.format("Should not happen, row index was ok, but the feature at this id was null."));
    }

    // find the boundaries
    double mzLo = Double.POSITIVE_INFINITY;
    double mzHi = Double.NEGATIVE_INFINITY;
    double[] masses = c.getMz();
    for (int i = 0; i < c.getNumPeaks(); i++) {
        double m = masses[i];
        if (m < mzLo)
            mzLo = m;
        if (m > mzHi)
            mzHi = m;
    }
    double rtLo = c.getRtLo();
    double rtHi = c.getRtHi();

    // add half a dalton to the sides and 30 seconds each way in RT direction
    return new MzRtRegion(mzLo-0.5, mzHi+0.5, rtLo-0.5, rtHi+0.5);
}
Enabling automated memory handling
Ufff… Everything will be wrapped into FeatureData2D which is a DataContainer… This API is really over-engineered and only serves to provide a level of type safety. So just copy-paste everything from AgilentCefTableModelData into a new class UmpireSeFeatureTableModelData
public class UmpireSeFeatureTableModelData extends FeatureTableModelData<UmpireSeFeature> {

    public UmpireSeFeatureTableModelData(DataSource<Features<UmpireSeFeature>> source) {
        super(source);
    }

    @Override
    public TableModel create() {
        Features<UmpireSeFeature> data = getData();
        if (data == null) {
            throw new IllegalStateException("You must have loaded the data from the data source before calling create()."
                    + "Use .load(Object user) on this object first.");
        }
        return new UmpireSeTableModel(data.getMs1().getList());
    }

}
Going back and actually putting something into the Lookup of our node
When we created UmpireSeDataProvider we left addCapabilitiesToLookup() method empty. Let's fix this by copy-pasting code from AgilentCefDataProvider:
@NodeCapabilityRegistration(
        fileCategory = UmpireSeTypeResolver.CATEGORY,
        fileType = UmpireSeTypeResolver.TYPE)
public class UmpireSeDataProvider extends AbstractCapabilityProvider{

    @Override
    public void addCapabilitiesToLookup(InstanceContent ic, FileDescriptor desc) {
        URI uri = Utilities.toURI(desc.getPath().toFile());

        AgilentCefFeaturesDataSource source = new AgilentCefFeaturesDataSource(uri);
        AgilentCefTableModelData data = new AgilentCefTableModelData(source);
        ic.add(data);
    }
}
Ok, the last piece of the puzzle is missing - that AgilentCefFeaturesDataSource, which we don't have for our data yet. This is the last class that we'll create - UmpireSeFeaturesDataSource and as always, copy-paste the contents modifying it.
public class UmpireSeFeaturesDataSource extends DefaultDataSource<Features<UmpireSeFeature>> {

    public UmpireSeFeaturesDataSource(URI origin) {
        super(origin);
    }

    @Override
    public Features<UmpireSeFeature> load() throws DataLoadingException {
        Features<UmpireSeFeature> features = new Features<>();
        try  {
            Path path = Paths.get(uri).toAbsolutePath();
            UmpireSeIsoClusters clusters = UmpireSeIsoClusters.create(path);
            if (clusters.getClusters().isEmpty())
                throw new DataLoadingException("The size of the list of features after parsing Umpire file was zero.");
            for (UmpireSeIsoCluster c : clusters.getClusters()) {
                UmpireSeFeature feature = UmpireSeFeature.create(c);
                features.add(feature, 1, null);
            }
            return features;
        } catch (IOException ex) {
            throw new DataLoadingException(ex);
        }
    }

}
You'll get an error for that features.add(feature, 1, null); because it uses a class defined in MSFileToolbox Module module, add a dependency on that.
Now we can fix the UmpireSeDataProvider:
@NodeCapabilityRegistration(
        fileCategory = UmpireSeTypeResolver.CATEGORY,
        fileType = UmpireSeTypeResolver.TYPE)
public class UmpireSeDataProvider extends AbstractCapabilityProvider{

    @Override
    public void addCapabilitiesToLookup(InstanceContent ic, FileDescriptor desc) {
        URI uri = Utilities.toURI(desc.getPath().toFile());

        UmpireSeFeaturesDataSource source = new UmpireSeFeaturesDataSource(uri);
        UmpireSeFeatureTableModelData data = new UmpireSeFeatureTableModelData(source);
        ic.add(data);
    }
}
There should be no errors now, you should be able to right click the DIA Umpire SE Features module that we were developing and click Build then Run the BatMass module to test it out.
Start the application, import some DIA-Umpire Singnal Extraction results into the LC/MS Features node, import the corresponding mzXML file into LC/MS Files node. With a right click on the ..._PeakCluster.csv file you should now have the option to open it in a table viewer and if you select BOTH the mzXML file and the csv file, then right click any of those, there will be an option for overlay in Map2D.