Setting up development environment
This guide will quickly step you through setting up the environment for developing new functionality for BatMass. All the downloads, setting up the IDE and up to building BatMass from scratch.
Setting up development environement for BatMass
You will only need this information if you want to develop your own plugins for BatMass or change its functionality in some way, if you're just a regular user you can skip this tutorial.
Don't be scared by the size of this tutorial, it just assumes that you know nothing about NetBeans and the NetBeans Platform. All the steps are simple.
Get the JDK (Java Development Kit)
BatMass is written in Java, so we'll need Java. Download and isntall JDK 7: e.g. from Oracle. It should work with OpenJDK as well.
The NetBeans platform
BatMass is built on top of the NetBeans platform (we will call it just the platform or NBP for simplicity). It's the same infrastructure that the NetBeans IDE is built on top of itself. This is an essential part of the setup, it is the platform that provides the Window system, the Loader, Automatic Updates and much more. All platform applications are developed against some version of the platform, which itself is just a collection of libraries (called Modules). Though it is possible to use the platform that comes with the NetBeans IDE, you'll likely encounter multiple errors due to incorrect dependency versions, so you'll need to get the platform version that we are providing.
Developing platform applications is much simpler with the NetBeans IDE as it provides a lot of wizards and other core functionality. It is possible to use ItelliJ as well, but we will not be covering this option, so go ahead and get the latest version of NetBeans (which is 8.1 as of this writing). You can select the Java SE version among all downloads.
- Download the platform files: from BatMass github repository.
- Unpack the downloaded archive, it contains four zip files
- Unpack the following 3 files to the same location, e.g.
/<path>/nbp:netbeans-...-harness.zipnetbeans-...-ide.zipnetbeans-...-platform.zip
- Do not unpack
netbeans-8.1-...-platform-src.zip - You should now have
/<path>/nbp/harness,/<path>/nbp/ide,/<path>/nbp/platform - Start the NetBeans IDE.
- In the main menu: Tools -> NetBeans Platforms.
- Click Add Platform and select
/<path>/nbp, the Platform Name text box on the right will show something like nb81, which means that the directory has been recognized as containing platform files. - Click Next, change the platform name to
nb-batmass(This is very important!) as it is and click Finish. - You should now see the newly created platform in the list, like this:
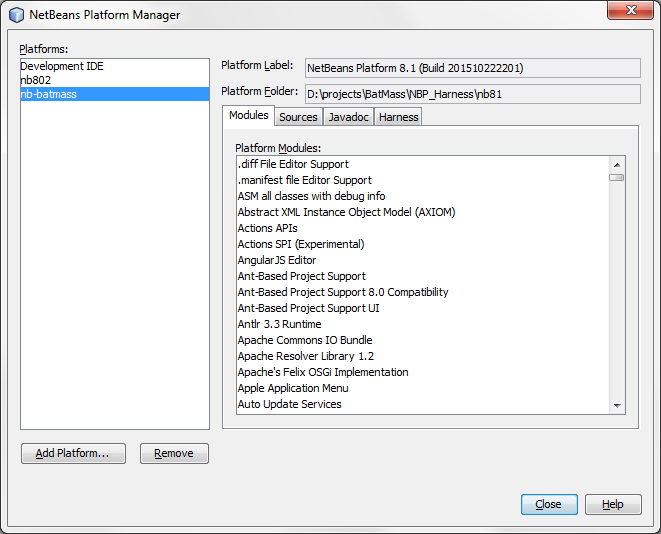
- Change the tab to Harness and make sure to switch the radio button to Harness supplied with Platform.
- Change the tab to Sources and add the path to .zip file
netbeans-*-platform-src.zipthat came with your platform download.
You should now have the environment set-up to bebing development.
BatMass modules
BatMass itself is composed of multiple modules which are split into several module suits. A module suite in the platform terms is just a collection of modules groupped together all of which have access to some common set of dependencies. Each suite lives in its own github repository, clone them all to the to the same location:
-
BatMass - the main suite, most of development happens here
-
BatMassLibs - all the library dependencies reside in this suite. In
-
BatMassExternalSuite - contains separate functional pieces borrowed from the web or elsewhere. E.g. the color- picker used in the options lives here.
-
MSFTBX - this is the data access library. It provides pure-java implementations of mzXML, mzML, pep.xml, prot.xml files among some others as well. The API (interfaces) is bundled with it.
Although this repository contains a NetBeans platform module project, you'll also notice that it contains a regular IntelliJ IDEA project as well, which has artifacts configured to build a regular jar out of it.
mkdir /<some-path>/batmass-projects
cd /<some-path>/batmass-projects
git clone https://github.com/chhh/batmass.git
git clone https://github.com/chhh/batmass-libs.git
git clone https://github.com/chhh/batmass-ext.git
git clone https://github.com/chhh/MSFTBX.git
You now have all the source code and libraries necessary to build BatMass.
Building the projects
-
Start NetBeans IDE
-
Main Menu -> File -> Open Project -
Holding down Ctrl select the 4 cloned projects, and open them (see image below)

-
Check the bottom right corner of the IDE for a progress bar, it might take a while to index the projects.
-
Right click
BatMassproject, selectPropertiesin the context menu. -
Select
Librariesin the Categories list on the left. -
Make sure that drop-down NetBeans Platform is set to
nb-batmassas in the image below, if this shows some other platform, switch tonb-batmass
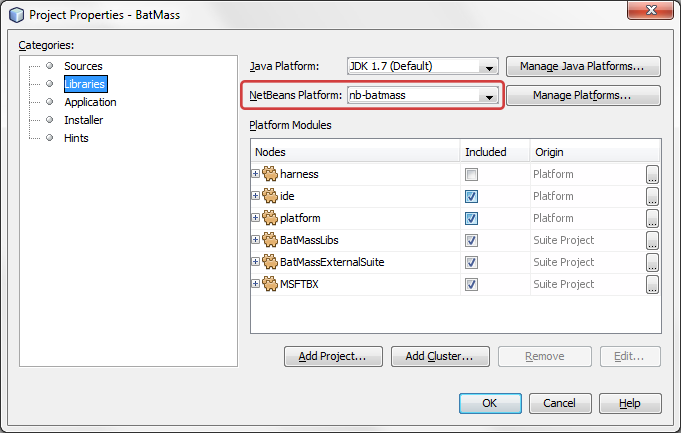
- If you see some errors in the Project Properties window (e.g. saying that some module lacks some dependencies, and the Resolve button is inactive), please contact us.
-
Check the selected platform for the other 3 projects as well.
We are ready to build the final product!
The build order is of importance. Automatic rebuilding of dependent module suits
was not set up to improve build performance.
Only the BatMass project depends on others, so whenever you make changes to
BatMassLibs, BatMassExternalSuite or MSFTBX you will need to manually
trigger a clean build on them, and rebuild the BatMass project after that.
- Right click
MSFTBXproject node in the Project Explorer and chooseclean build - Now do
clean buildforBatMassLibsandBatMassExternalSuite - You can now
clean buildthe mainBatMassproject - When the build is done, go to
Main menu -> Run -> Set main projectand selectBatMassthere. This will force the greenRunbutton (F6 shortcurt) to always launch this project and not the currently selected one. - Run the project:
Main menu -> Run -> Run main project
If all is well and you can start the project, you should also be able to
create the installers for it. Right click BatMass project, Package as -> Installers. This is a time-consuming process, when done, you'll find the
installers for different platforms in batmass-projects/batmass/dist.